


After long and sunny summer, the fall starts to kick in. Now is the time to get geared up for the winter’s R&D challenges, which is why I would like to present the Ansys Discovery simulation platform using a structural simulation case as an example.
The Ansys Discovery really is an attractive choice for organizations that want to expand their simulation user base and have the ability to reuse these early simulations in state-of-the-art analysis. This expanded usage will drive for faster time to market, reduced design cycles, and operational efficiency.
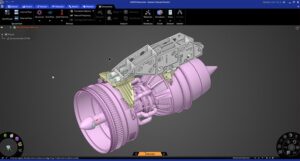
Structural simulation of a generic engine mount is used for demonstration to describe the workflow and highlight functionality. Take a cup of coffee and bear with me for few minutes while I go through this modern marvel of simulation.
Modes of Ansys Discovery
By default, Ansys Discovery launches on Explore mode, which uses a live GPU-based approach to solve simulation. The Refine mode utilizes Ansys Mechanical CPU-based solver with additional capabilities. Should you want to alter the geometry, you can find all direct modeling tools in Model mode.
operation mode is selected at the bottom of the screen.
Getting around in Ansys Discovery

A new approach to make typical simulation features easily available for the user is having a black hexagon hoovering in the screen. It is called HALO and it expands with a mouse click and closes with pressing ESC or clicking in the background.
In our structural analysis example, we define the mounting points as supports using CTRL for multi-select and then accept the selections made by clicking the tick mark. The Heads Up Display (HUD) user interface allows us to continue working on the model rather than forcing us to run around the screen for typical selections.
HALO makes tools accessible in a fast and simple way. The inner circle allows the user to get access to selection, geometry editing, or physics tools. As shown here, when the physics tool is selected, different structural physics features are presented in an expanded window.

In this sample, we will load the mounting points with a 4-ton engine and its trust. The load is stated as a remote force and as a mass in 10 holes. Since both loads affect the same surfaces, it makes sense to store the selection as a named selection, thus being able to reuse it in the definition of loads. Pressing F1 brings in the overlay help system, should I have any challenge with defining force or mass.

Contacts tuning and materials
Contact in Ansys Discovery defines how different bodies relate to each other. Do they bond to a single body or are they able to separate? By default, all bodies within contact detection distance are bonded.
Contacts can be found at the bottom of the Physics tree. In this example, double-clicking allows the editing of 30 default bonded contact pairs where each contact definition is represented by a small white sphere and colored contact surfaces. The Contact Review tool is used to alter the default behavior – i.e., letting some of the surfaces separate.
Should you have small gaps in the model, like a free bore in a drilled hole, you can either go through the model and set each free or set the contact detection distance to smaller than the gaps in the model.
Materials are by default structural steel and can be changed by using the HALO feature mentioned earlier.

Running the simulation and investigating results

Since our model is now complete, we can run it using the controls located in the lower-right corner of the screen. Just press the green start button, and Ansys Discovery solves it using GPU since we are in Explore mode. The results are computed within a couple of seconds and there is a nice collection of tools available to evaluate them.
When a simulation has been run, the result handling tools are shown in the lower-right part of the screen. In the inner circle, you find tools for clipping, setting deformation, animation, etc. The outer circle contains tools to select the proper result type.
The fidelity adjustment is done in the Simulation Information Display (SID). The SID brings notifications to the user, allows for adjustment of accuracy and selection of simulation physics. The resulting legend is freely movable and allows the modification of units and legend scale range.

It doesn’t end here
The Explore mode is fast, but if you want to have some additional controls and features, you can use the Refine mode, which uses the Ansys Mechanical CPU, solver. If that doesn’t have enough punch, you can use the HPC add-on license package or transfer the simulation model to Ansys Mechanical, either on your workstation or in Ansys Cloud.
In addition to structural analysis, Ansys Discovery has thermal, fluids, and modal capabilities. This will make Ansys Discover versatile and approachable when it comes to expanding the simulation user community at your organization.
Solving high-fidelity simulation in Ansys Discovery requires an additional license, depending on the physics. To leverage the Ansys Mechanical Solver for structural and thermal physics requires the Mechanical Pro license, whereas solving fluid physics requires the CFD Pro license.
Summary
To summarize this introduction, I would want to highlight the following points in Ansys Discovery:
- Scalable simulation solution with a modern user interference
- First time and casual users will benefit from the Welcome screen help, interactive tutorials, and classic F1 function with a modernized overlay type presentation
- Fast results with GPU-based Explore mode
- Detailed results with CPU-based Refine mode, which enables the use of joints and non-linear contacts, local mesh sizing, mesh visualization, etc.
- Advanced users will benefit from the ability to transfer analysis to flagship applications like Ansys Fluent and the possibility to use Ansys Cloud.
I hope this has piqued your interest in Ansys Discovery! If you want to know more, please contact us.
Best regards
Mikko

